Support
Getting started
About five minutes with your phone. You need your WiFi name and password, and your airport codes in the order your map is wired.
First-time setup
Plug in the hub
The lights sweep once, then turn solid red. Red means the hub is in setup mode and has opened its own WiFi network.
Join the hub's network
On your phone, open WiFi settings and join
DIY_METAR_SETUP. It has no password. Your phone may warn that it has no internet; stay connected anyway.Open the setup page
Open your web browser and go to
192.168.4.1. The page does not open by itself, so type the address. You will see the hub's firmware version, serial number (S/N) and MAC address at the top.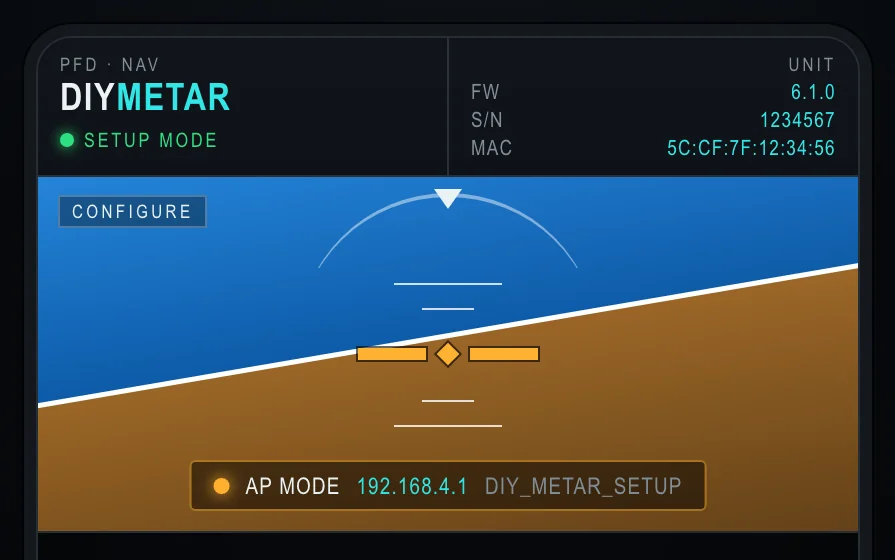
Pick your WiFi
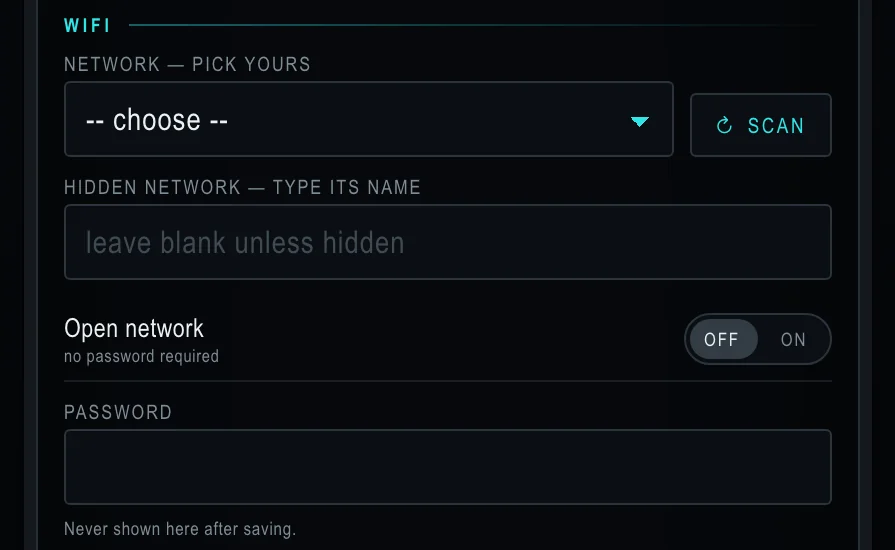
Choose your network from the list. Tap Scan if it is missing. Type the password. For a hidden network, type its name in the second box. For a network with no password, turn Open network on. The password is never shown on the page again after you save.
Enter your airports and display settings
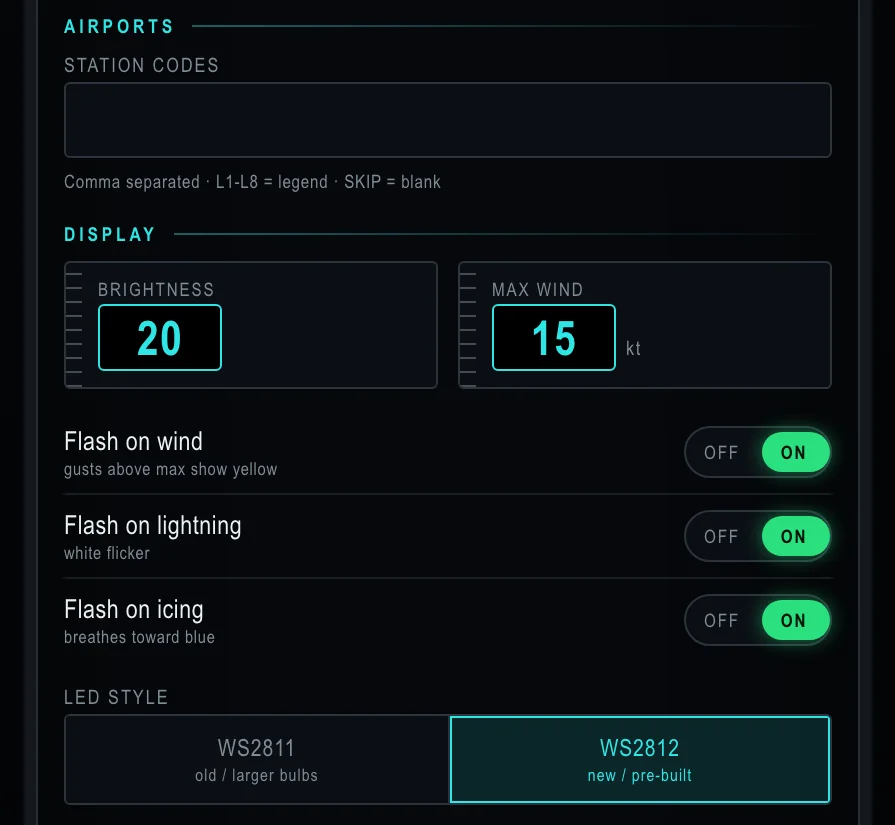
Type the airport codes separated by commas, in the order the lights are wired, starting with the light closest to the hub. Then set brightness, your max wind, the flash options and your LED style.
Choose time and sleep options
Pick your timezone; it controls the sleep timer. Turn on Sleep timer if you want the map dark overnight, then enter sleep and wake times as four digits, like 2200 and 0630.
Save
Tap Save at the bottom. The page says Saved and the map restarts. After a light sweep and a short pink startup, your weather appears. Rejoin your normal WiFi on your phone.
If something needs fixing, the page lists exactly what. Everything else you entered is kept, so fix those items and save again.

The setup page looks the same on Hub 1.0 and Hub 2.0. Screens here show example values.
Getting back to setup
To change WiFi, airports or any setting later, put the hub back in setup mode with a power double-tap. There is no button to press.
With the map running: unplug it, plug it back in, then unplug again within 10 seconds and plug in once more. The map turns solid red and DIY_METAR_SETUP appears. Follow the steps above from joining the hub's network. Your current settings are already filled in.
Your airport list
The list is your map's wiring order. The first code lights the first light after the hub, the second code the second light, and so on down the strip. Codes are four-letter ICAO identifiers (for US airports, K plus the three-letter code). Separate them with commas; spaces are fine.
KPHX,KSDL,KFFZ,SKIP,KIWA,KCHD,L1,L2,L3,L4,L5
SKIPstays dark, for a spot with no airport.L1toL7are legend lights with a fixed color: VFR green, MVFR blue, IFR red, LIFR magenta, windy yellow, white and cyan.
Up to 300 lights and 1,500 characters. If one airport's light shows another airport's weather, a code is missing or out of order: count along the strip from the hub. More in the FAQ.
Every setting
| Setting | What it does | Values |
|---|---|---|
| Brightness | Overall light level. Low values can make green lights hard to see in a bright room. | 1 to 99 |
| Max wind | Wind or gust speed above which an airport counts as windy. | 1 to 99 kt |
| Flash on wind | Windy airports flash yellow. Off: they stay solid yellow. | On / Off |
| Flash on lightning | White flicker when a report has lightning. | On / Off |
| Flash on icing | Breathes toward blue when a report has freezing precipitation. | On / Off |
| LED style | Match your lights: WS2811 for older, larger bulbs; WS2812 for newer pre-built strips. The wrong one swaps colors. | WS2811 / WS2812 |
| Fill blank weather reports | Shows airports with no report in green instead of dark. | On / Off |
| Skip startup light sweep | Skips the light sweep at power-on. | On / Off |
| Dim airports after sunset | Dims each airport after its own local sunset. | On / Off |
| Run light show | Restarts the map, plays the light show for about 5 minutes, then returns to weather. | Button |
| Timezone | Used by the sleep timer. | Eastern, Central, Mountain, Arizona, Pacific, Alaska, Hawaii, UTC |
| Sleep timer | Blanks the map between the sleep and wake times. Weather keeps updating. | HHMM, e.g. 2200 / 0630 |
Weather refreshes about every 15 minutes, and updates install on their own (the lights breathe white while installing; leave it plugged in). Your settings carry over through updates.
Maps on older firmware (4.x)
Setup mode on older maps works a little differently:
- Plug in your kit and wait about 30 seconds for pairing mode: the lights turn red (green on new-style lights) on first-time setup.
- To re-enter setup mode after the first setup: plug the map in, unplug it within 3 seconds, and quickly plug it back in. All the lights turn red. Wait 30 seconds.
- Connect to WiFi: on your phone or computer, join the
DIY_Metar_Setupnetwork. - Update the settings: go to
192.168.4.1and enter your WiFi name, password, airport codes and brightness. You must pick a setting for each box. Light number 1 is the one closest to the hub. - Restart and enjoy: click save, and the hub saves the settings and restarts. It then downloads the current weather for each airport. The first download can take 5 to 10 minutes on a large map.
Older maps use 2.4 GHz WiFi only, and the WiFi name and password must match exactly, capital letters included. See map stuck on pink if it will not connect, and firmware updates to move an older map to 6.1.